Bootstrap Tabs Using
Introduction
In certain cases it is actually pretty effective if we have the ability to simply just place a few segments of info sharing the very same area on page so the site visitor easily could search through them without really leaving behind the screen. This gets conveniently obtained in the brand-new fourth version of the Bootstrap framework with the help of the
.nav.tab- *Efficient ways to use the Bootstrap Tabs Styles:
First of all for our tabbed section we'll desire several tabs. To get one develop an
<ul>.nav.nav-tabs<li>.nav-item.nav-link.activedata-toggle = “tab”href = “#MyPanel-ID”What is actually new inside the Bootstrap 4 framework are the
.nav-item.nav-link.active<li>And now once the Bootstrap Tabs Border structure has been simply made it's opportunity for designing the control panels keeping the certain information to become featured. Primarily we need to have a master wrapper
<div>.tab-content.tab-pane.fade.active.in.fade.tab-panelid = ”#MyPanel-ID”You can easily likewise develop tabbed sections using a button-- just like visual appeal for the tabs themselves. These are in addition indicated as pills. To execute it simply make sure in place of
.nav-tabs.nav-pills.nav.nav-linkdata-toggle = “pill”data-toggle = “tab”Nav-tabs methods
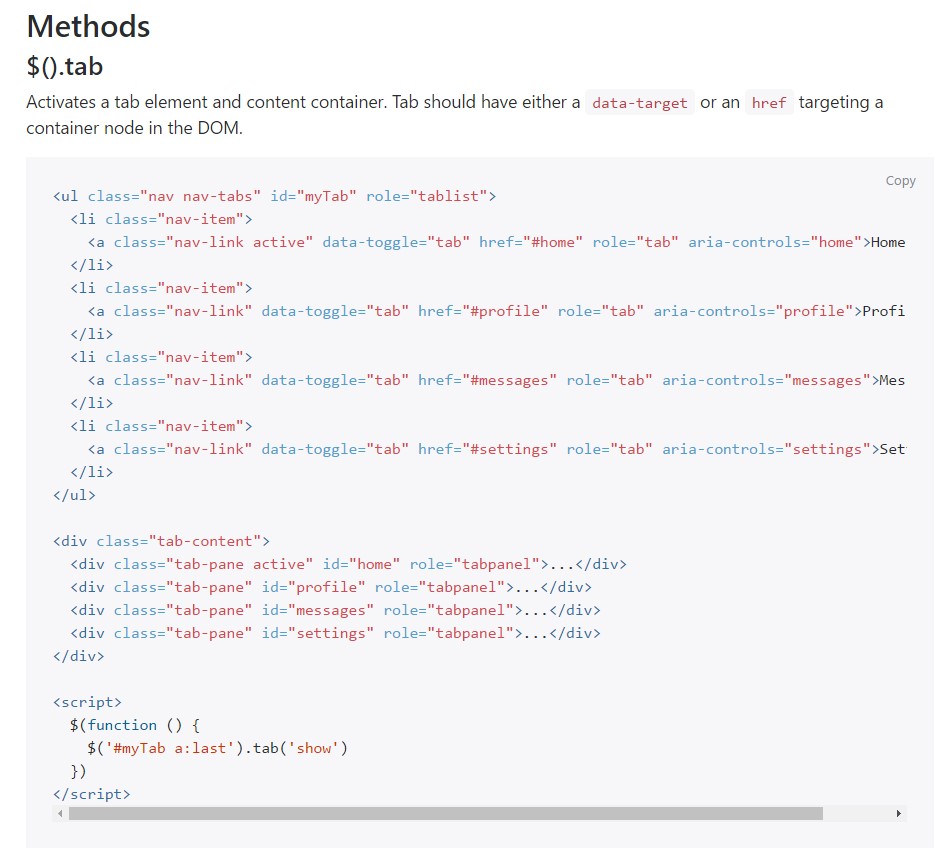
$().tab
$().tabActivates a tab component and information container. Tab should have either a
data-targethref<ul class="nav nav-tabs" id="myTab" role="tablist">
<li class="nav-item">
<a class="nav-link active" data-toggle="tab" href="#home" role="tab" aria-controls="home">Home</a>
</li>
<li class="nav-item">
<a class="nav-link" data-toggle="tab" href="#profile" role="tab" aria-controls="profile">Profile</a>
</li>
<li class="nav-item">
<a class="nav-link" data-toggle="tab" href="#messages" role="tab" aria-controls="messages">Messages</a>
</li>
<li class="nav-item">
<a class="nav-link" data-toggle="tab" href="#settings" role="tab" aria-controls="settings">Settings</a>
</li>
</ul>
<div class="tab-content">
<div class="tab-pane active" id="home" role="tabpanel">...</div>
<div class="tab-pane" id="profile" role="tabpanel">...</div>
<div class="tab-pane" id="messages" role="tabpanel">...</div>
<div class="tab-pane" id="settings" role="tabpanel">...</div>
</div>
<script>
$(function ()
$('#myTab a:last').tab('show')
)
</script>.tab(‘show’)
.tab(‘show’)Selects the delivered tab and gives its own connected pane. Any other tab that was previously chosen ends up being unselected and its related pane is hidden. Come backs to the caller before the tab pane has in fact been revealed ( id est right before the
shown.bs.tab$('#someTab').tab('show')Occasions
When demonstrating a brand new tab, the events fire in the following ordination:
1.
hide.bs.tab2.
show.bs.tab3.
hidden.bs.tabhide.bs.tab4.
shown.bs.tabshow.bs.tabIn the case that no tab was readily active, then the
hide.bs.tabhidden.bs.tab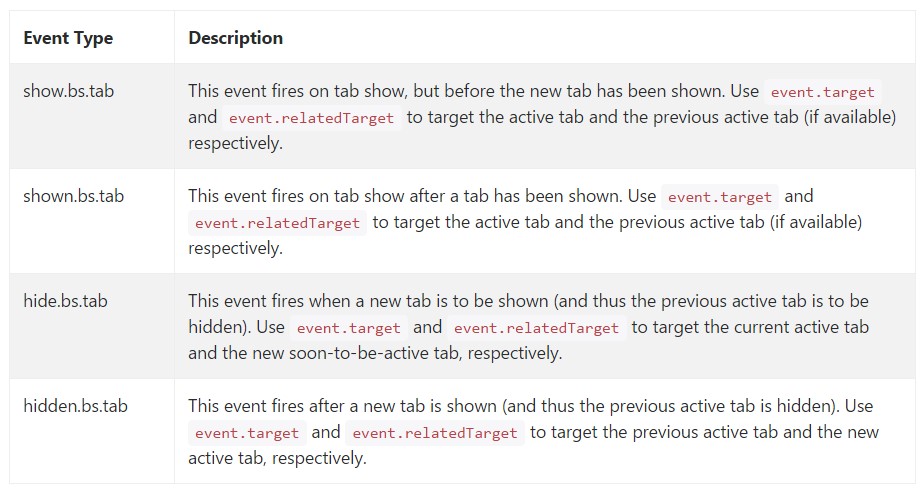
$('a[data-toggle="tab"]').on('shown.bs.tab', function (e)
  e.target // newly activated tab
  e.relatedTarget // previous active tab
)
Conclusions
Well basically that is actually the manner the tabbed control panels get set up with the latest Bootstrap 4 edition. A point to look out for when generating them is that the different elements wrapped inside each and every tab control panel should be practically the identical size. This will really help you avoid certain "jumpy" behaviour of your webpage when it has been certainly scrolled to a targeted setting, the site visitor has started surfing through the tabs and at a particular moment gets to launch a tab having extensively extra material then the one being actually viewed right before it.
Examine a few on-line video guide about Bootstrap tabs:
Linked topics:
Bootstrap Nav-tabs: formal records
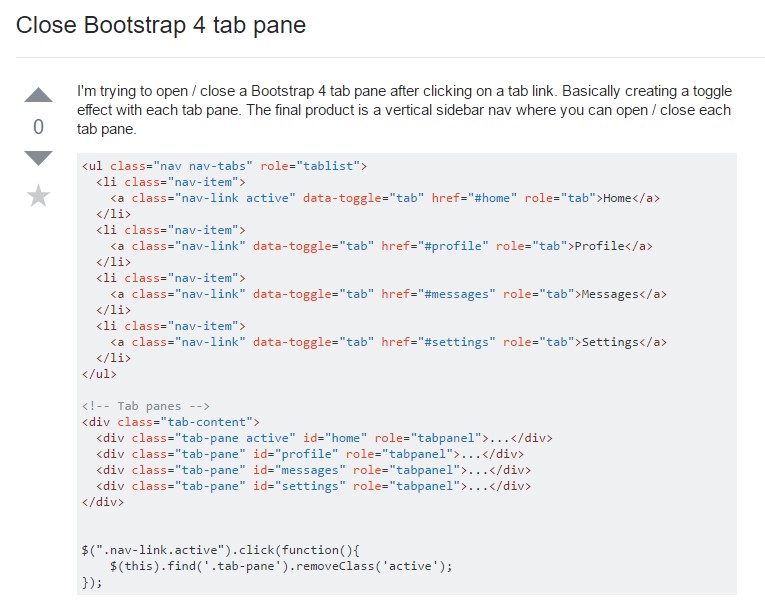
The ways to shut off Bootstrap 4 tab pane
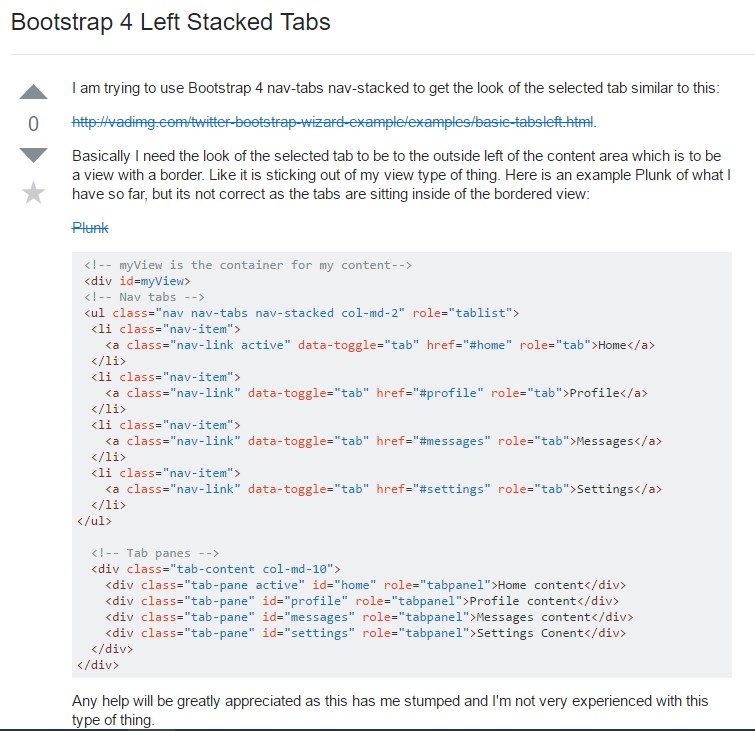
Bootstrap 4 Left Stacked Tabs